Welcome!

Welcome to my New Blog. This blog is for sharing my crafting ideas and my cutting files that I create primarily using the Make the Cut Software and my electronic cutters which include my 18" Black Cat Cougar, a Silhouette SD, and an original Expression.

All files and information shared here is for your personal use only. Please contact me if you wish to use any items commercially, for blog contests, or to submit for magazine publication. Thank you.

Thursday, April 12, 2012

Sliding Pop-Up Card MTC File to Share

This is picture of card closed as first seen.
Hey everybody.  I wanted to share this Make the Cut file I created based on a Sliding Pop-up Card Tutorial written and shared by Kim Score on the Splitcoaststampers website.   There is also a video tutorial shared there as well for those who want a "visual".  You can also check out the Splitcoast Gallery of cards created based on this tutorial as well. Kim used a Raggedy Andy style image to popup on her's, he is so cute, I think that is what first drew my attention (looks like might have been a valentine card). (I Love the Mickey one in the Gallery that was created by midnightsmum as well!) You can also find Kim's personal blog at Paper Punch Addiction. I need to go check out her site and see more of her work!

They are fairly simple "pieces" to cut and score manually so some might wonder why I would create a "cut file" for something like this.  Well first, I am manual paper cutter and ruler challenged!  LOL  I cannot seem to get a "straight line" for the life of me.  Plus, I hate having to have to "measure" all the time.  By creating this cut file, I don't have to worry about cutting the edge straight or measuring off for the score lines each time I want to create this card.  I just lay my paper on the mat, press a few buttons, and I'm ready to start assembling!  There are several "notes" in the cutting file so be sure to read those, especially regarding how to use score lines in the file if you are unfamiliar with that.
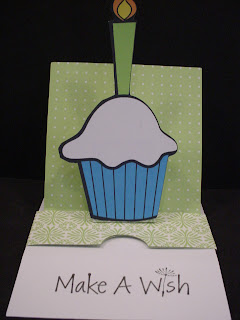
This is picture of card opened and showing message.
My sample card was created using double sided paper and a "print and cut" cupcake image I had previousl found for free online and cut with the Silhouette SD (it was in my cut but not used yet pile!).  Kim does recommend using a heavy cardstock when making htis card.  I didn't have a really heavy cardstock so used what I had.  It worked okay but I can see where a heavier cardstock would probably be better.

 Make sure that you read Kim's directions throughly before starting to assemble. I would also recommend creating a "mock-up" first from some inexpensive paper before using any good paper that you only have 1 sheet of! Watching the video would probably be a good idea too! It's not really that complicated once you get it all figured out. Good luck and let us see what you create with the file!  Please note, the file does not include the cupcake with the candle.

As always, thanks for stopping by!  DD's Travel VB will be ending soon and I hope to be able to maybe start to create and share some more files here on my blog sooner rather than later!

If you have a 4shared account you can download the MTC cutting file here Sliding Pop-Up Card. If you don't have a 4shared account, you can signup to get one for free and then download the file.  This appears to be a change in their Terms of Use, you didn't need to have your own account in the past in order to download my files. I am exploring other options for sharing my files since I don't want people to have to have a 4shared account just to get my files. However, since I don't charge for my files and I don't have ads or anything on my blog to make $$ I need to find a simple and free option to do so.  Stay tuned and I will update as soon as I figure something out! I have only shared a MTC file here since that is how I created my file and it is really fairly simple file to recreate from Kim's directions if you prefer another format.

UPDATE:  I have also shared the file in a dropbox account.  You can find the Sliding Pop-Up Card there as well. It should download directly to your computer.

Thursday, March 22, 2012

When looking for the football outline for the T-shirt to share, I ran across this football shaped card that I had also made last Fall but had never shared the cut file for.  I originally made the card to give to my son to celebrate scoring his first Varsity Touchdown!  He is just a freshman so that was a really big deal!  PLUS, it was even bigger because neither myself nor my husband was there to see it!  : (  In our defense, our school has to travel alot for our games and both DD and DS had games that night (she plays Volleyball).  He was 2-3 hours away and she was at home.  As a Freshman, he indicated that he probably would not get into that game so no need for one of us to come!  Alas, not true!!  We were winning by a good margin already and they put him in towards the end of the game and he scored!  I was so happy and yet so sad!  I did get to see it on the "Web" as we broadcast our games that way!  Anyway, I knew I needed to make him a card to celebrate and let him know we were sorry we missed it and we proud of his hard work and effort that gave him the opportunity to play.

There are several layers to the card.  There is a black base and then there are two white layers in the file.  I think I just went with the one with the 3 pieces cut rather than the solid white base.  I used the swiss dots embossing folder to add the texture and then used some ink to "rough" it up and make it look like a well used football.

You can download the  .mtc (Make the Cut) Football Shaped Card here.

Wednesday, March 21, 2012

Football Shirt Design

I had previously shared a picture of this football shirt that I made but realized that I had never shared the file when someone recently asked on the MTC forum for a "football outline" for making shirts and I was going to point them to my blog to get this one and when I came to get the link realized that I had not yet shared the file!  So, even though its not presently football season, I wanted to get this file up so I could share it with that person looking for one! There are two layers, a white layer and then a dark green layer that goes on top.


Please note.  It has my children's school logo in the middle (we are Spartans) - just delete and replace with logo of your choice. It is also "mirrored" already for cutting with HTV and placement onto a T-shirt.  If you don't need to cut and mirror just flip or unmirror it.

You can download the Football Outline for T-shirt here.

Tuesday, March 20, 2012

Crab, Palm Trees, Waves, and Umbrella for the Beach

Hey everybody.  Been extremely busy and hadn't gotten back recently to share any files that I have created but not shared (no time to create right now it seems either!). I happened to run across this file while "cleaning up" and remembered that I had never shared the file.  Looks like I made it a while ago!  It was from a free pattern I had found. It contains two palm trees with coconuts, the crab and the umbrella.  The sun is simply a small circle and the sand is torn kraft paper that I used the swiss dots embossing folder on and inked the edges and the "dots" to give it texture.  I used a "texture" ink pen on the wave tips.

You can download the Make the Cut file from my 4shared account here. (I use 4shared as it is free and easy to deal with).  Download the Crab, Palm Trees, Umbrella File here.

Saturday, March 10, 2012

Bunny Card With Files to Share

Continuing with another old post from my old blog. I liked the bunny card I posted yesterday so much that I REALLY wanted to share it with people.  SO, I decided to create my own bunny card using basic shapes in my Make The Cut Software.  Although this file was inspired by the previous Bunny Card that I shared yesterday from a pattern in the Spring, 2011 edition of Paper Creations magazine (Issue 28) designed by Maricel Fabi, this one I created from basic shapes in MTC.  Isn't it amazing what you can do by welding a few circles, ovals, triangles, etc. together!  If you look closely, you can see that difference in my bunny's ears, the paws, the nose, the vest, and his overall basic shape.

So, if you thought, "shoot, I would have really liked to have had that pattern" yesterday - now you can have one almost like it but one that I feel comfortable sharing here.  I have included in the Make The Cut file both a welded shape for the card joined and folded at the ears as well as a single bunny shape for use on other projects. There are two files for svg users.  One is for the card its self and the "accessory" parts.  There is a second one for the single bunny shape with paws and feet only. Thanks to Maricel for her inspiration.

I used the "swiss dots" embossing folder to emboss the inner ears on this one.  I didn't add "buttons" to the vest, I created a vest with the "buttons" cut out.(My file contains both vests, one with the circles cut out and one plain.) I pop dotted the nose and the paw holding the flower.  My sample card appears to have his left arm (paw)  "bent" behind him but there is an extra arm to add on that side if desired. This card used 15mm goggle eyes with lashes.  Yesterday's card the eyes were 10mm.  I had previously tried 10mm size with lashes when I made my first one but didn't like it for some reason.  I do think with the larger eyes it works.

Please let me know if you enjoyed my file and let me see what you do with it.  I also think he would be cute made into a "she" bunny (add some lace to the bottom of the vest and make a dress and add a bow to an ear) or holding an Easter Egg or an Easter Basket.  Just use your imagination!

You can Download my Make the Cut file of the Bunny Card here.

You can Download a SVG file of the Bunny Card here.

You can Download a SVG file of just the single Bunny Shape here.

Thanks for stopping by!