Welcome!

Welcome to my New Blog. This blog is for sharing my crafting ideas and my cutting files that I create primarily using the Make the Cut Software and my electronic cutters which include my 18" Black Cat Cougar, a Silhouette SD, and an original Expression.

All files and information shared here is for your personal use only. Please contact me if you wish to use any items commercially, for blog contests, or to submit for magazine publication. Thank you.
Showing posts with label Birthday. Show all posts

Tuesday, October 16, 2012

Have a "Sweet" Birthday "Print and Cut" Image

A couple of weeks ago, someone on the MTC forum had asked how to take a "digital" image of a cupcake with some text and stars encircling it and "change" the color of the text in a word processing program or some other program. The problem was the file was a png file and it was not "editable" in that format. I had suggested that the user could use "pixel trace" in MTC to pull the image in, break it apart and make it "editable" so she could change colors, etc.  I then proceed to do that in MTC to show her.  Well, it took a little time and effort to do it (more than I originally thought it would).  So, then I decided to see if I could create my own similar file directly in MTC and see if it would take less time then trying to pixel trace and edit the other one.  To do the circles of stars and the text in a circle, you use the "wrap object to path" tool in Make the Cut.  (I wrapped to a circle sized as needed.  Once that is done, you can delete the circle as it is not needed). Time wise, this one may have taken a little less time on the whole but probably not a lot.

However, since this one is a file I created on my own, I figured I would share it here for anyone who might like to make use of it. My vision was that it would be used as a "print and cut" or like a digital stamp image that you printed out as opposed to a "paper piecing." Each part of the image is on its own layer and can thus have its "color" changed easily.  Don't want yellow stars, make them purple. Want one row of stars one color and the second row another, you can do that as the two rows of stars are on separate layers.  Want the text to be orange, easy to do.  Prefer yellow icing on your cupcake, go ahead after all, its your card and your image - give it your own personal touch! The bottom image shows how easily I changed colors in the file.

I'm sharing both a MTC file as well as an SVG file for you to download.  These are shared via my public folder in my dropbox account. As always, I would love to see anything that you might create with this file.  It would make a great image to use in the middle of the "swinging Z" cards that I created and shared previously here on my blog.

You can download the Sweet Birthday Cucpake MTC file here.

You can download the Sweet Birthday Cucpake SVG file here.

As always, thanks for stopping by.


Wednesday, July 25, 2012

Happy Birthday Book or Card from Royal Inspirations SVG

Hello again!  Two posts in two days!  A new record for me!  LOL  Well, at least for the past little while.  I'm going to try and get better, I promise.  I do have some things to share with you, just no time to sit down it seems to get it all written up, photos taken, and posted! Summer time seems to make it even more difficult.  We'll see if I can improve once school starts back next month!

Yesterday I shared with you a new site, Royal Inspirations SVG started by my friend Retta. On her site she has lots of wonderful files that you can obtain in 3 formats so she should have almost all of you covered.  Not only does she provide the files in SVG format, but she also provides them in Make the Cut (MTC) and SCAL formats as well so that should mean that she probably has a format that works easily for you!  She has files in a variety of categories and price ranges and even has free files for you to download and try so be sure to stop by and find some that will inspire you!

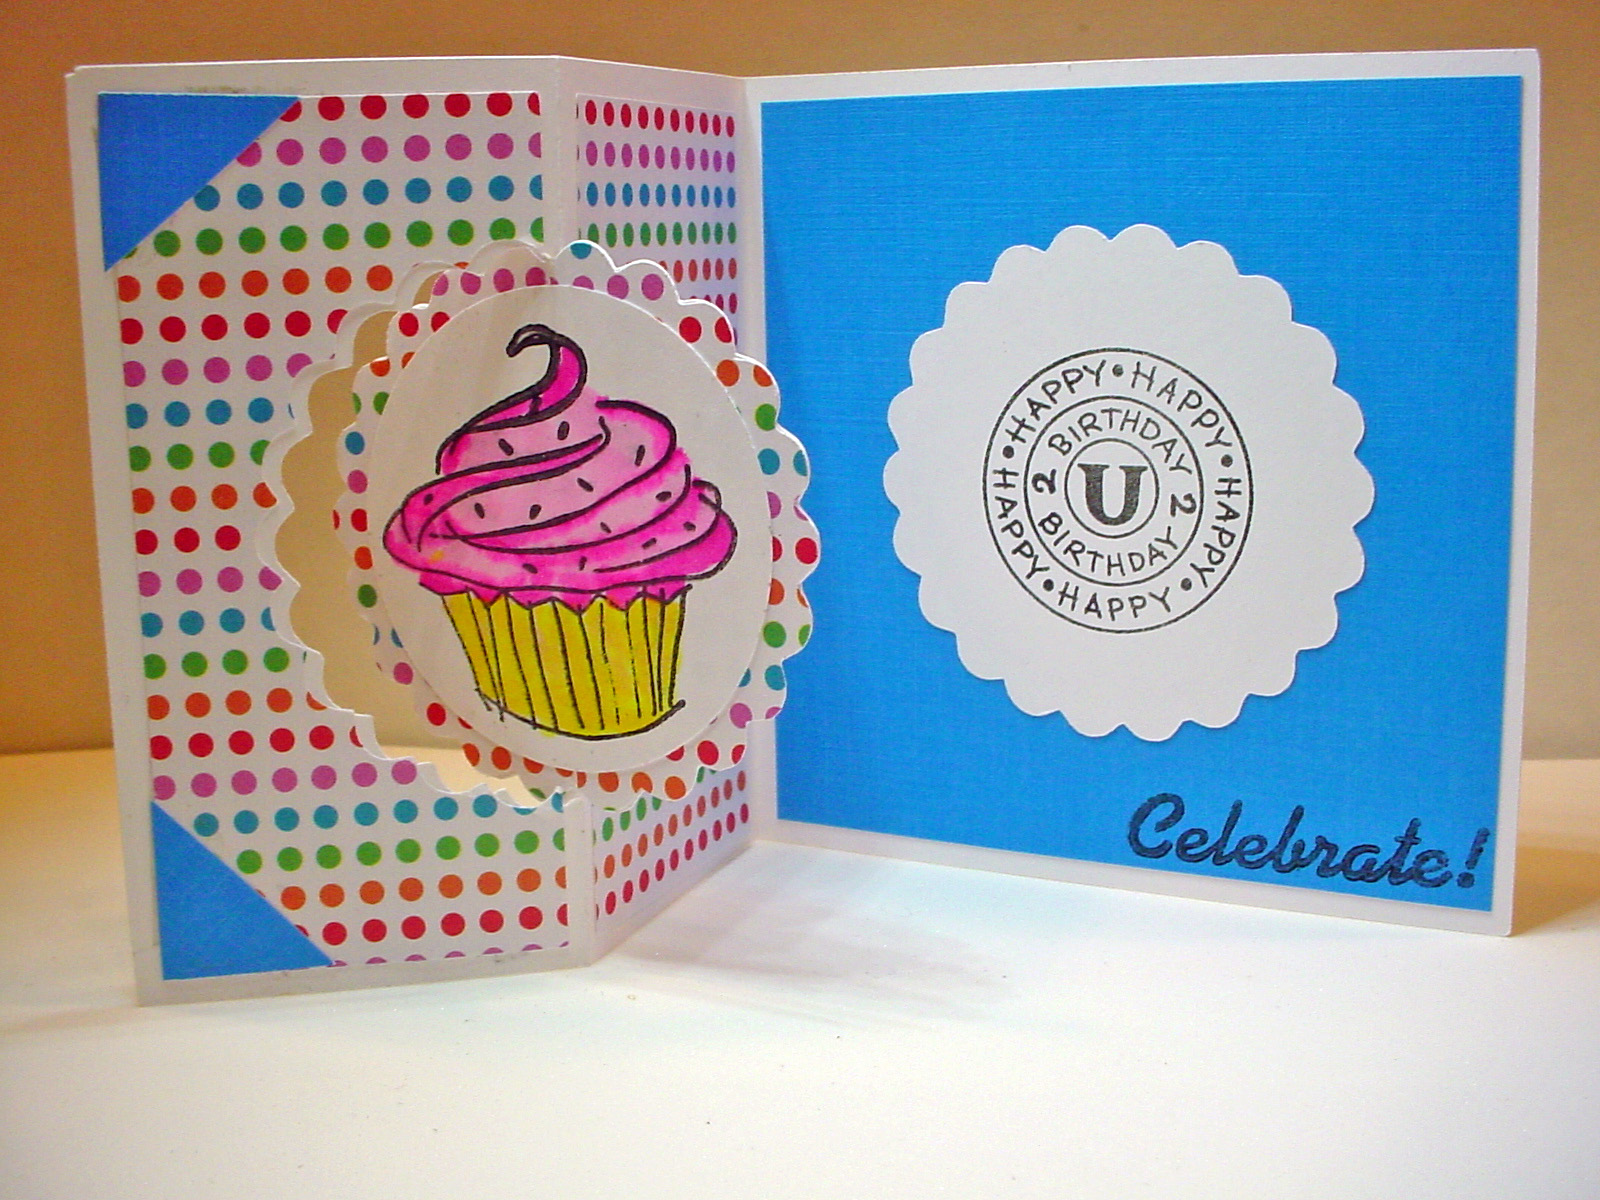
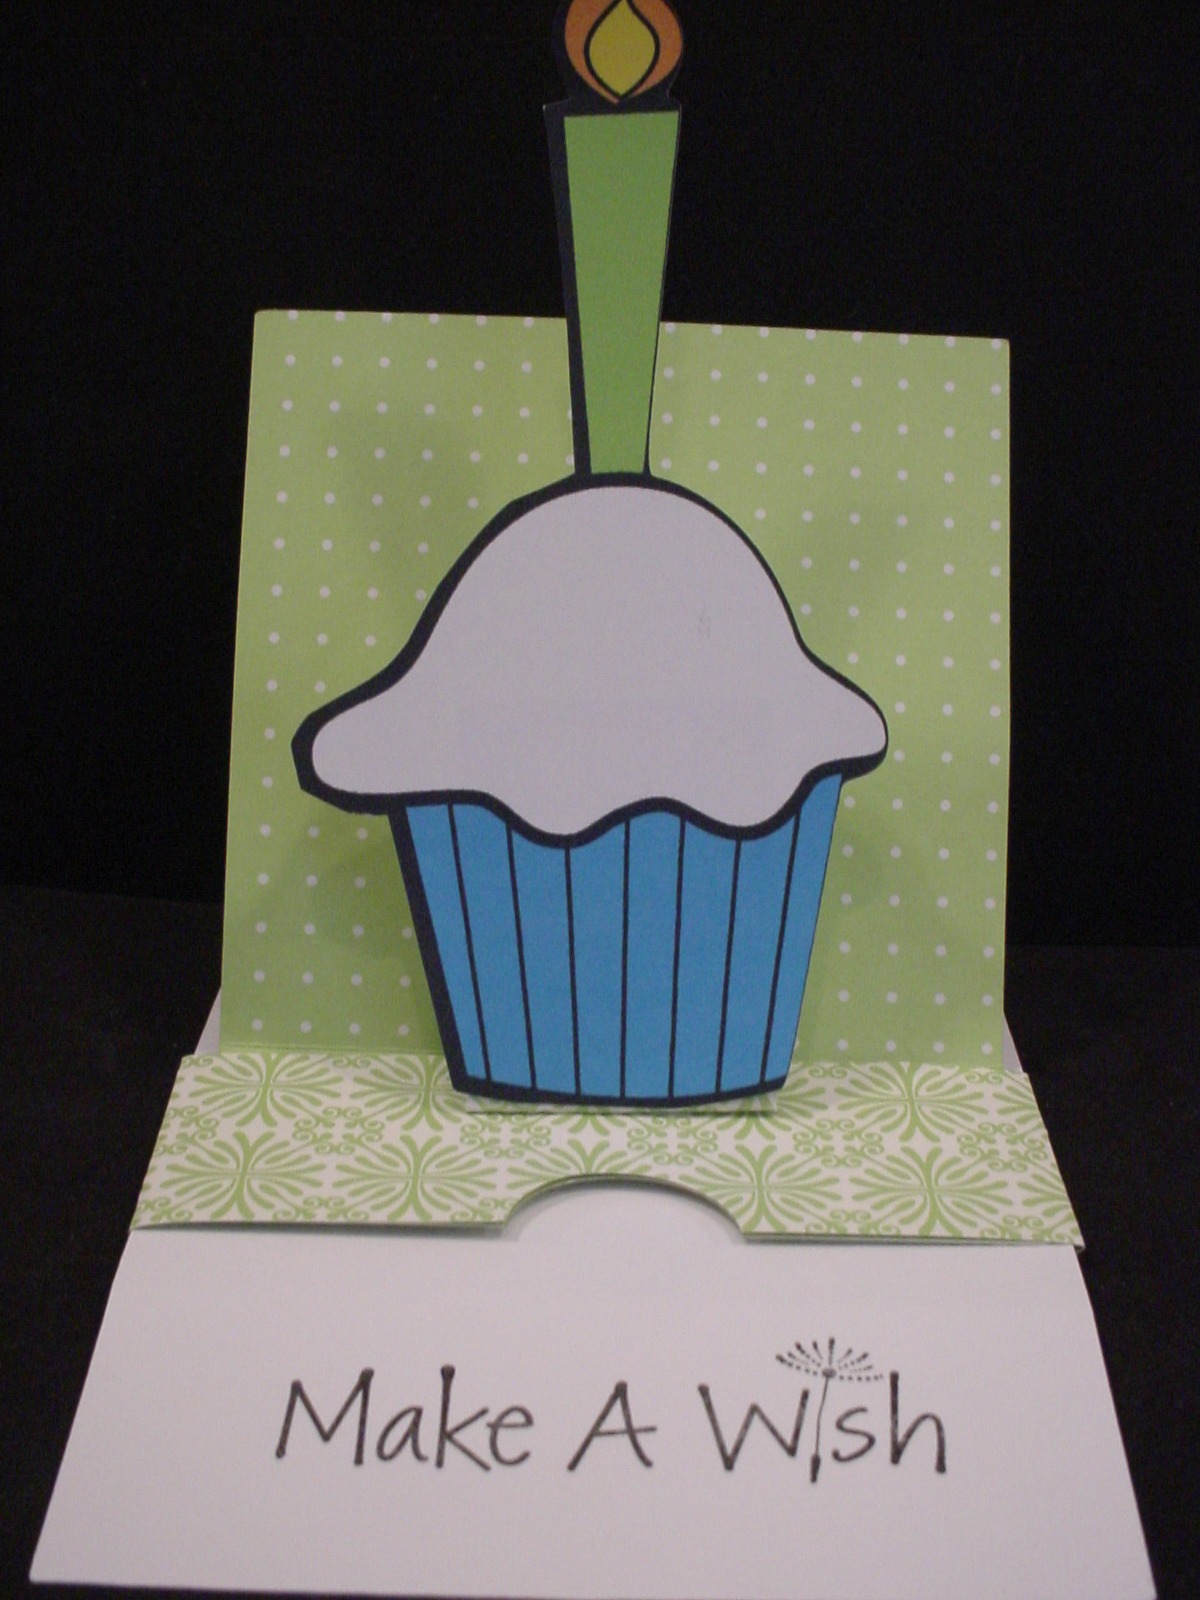
When I saw this Birthday "Book or Card" that Retta designed I just knew that I had to have it!  I wasn't sure when I was going to actually use it, or who the lucky recipient was going to be but I knew I had to get it and create it!  It's wonderful!  The one thing I learned however is that with something like this, you want to make sure that you have a really good sticky mat to ensure those beautiful letters stay put on the mat while you are cutting them!  I have a bad habit of trying to reuse mats over and over and over again even when I should stop and fix them!  I thought I could squeeze a few more cuts out on this one with a little help from my painter's tape but no go.  However, once I broke out a new mat, it was easy breazy and I was wondering why I had wasted my time and paper to start with!

Instead of using chipboard for my "book" backing, I choose to use some neon green styrene that KarenP had first shared about finding on the MTC forum.  It matched great with my green letters and added just enough backing to my pages.  It gives the book that little extra "pop"!  Best of all, it and Retta's files cut great on my Black Cat Cougar that I have been neglecting! 

Speaking of my Cougar, I Love my Cougar, but that doesn't mean that I'm not green with envy about those who are getting the newest cutter, The Silver Bullet,  from Sherri at That's Scrap, Inc. in the USA, Dawn at Thyme Graphics in the UK  and Jo at Cutting Edge Craft in Austrailia too! They look wonderful and I am hearing great things about how well they are cutting too!  Wish I could justify getting one too (I do love new gadgets and toys) but I will stick with my Cougar for now as it does everything I need and more.  I just need to use it more (then maybe I can justify a Silver Bullet too! : ) )  However, if YOU are in the market for a new cutter that will work with MTC and SCAL be sure to swing by and check out the Silver Bullet!  They may just have one with your name on it! But even better than the cutters themselves, is the customer service and support that each of these 3 ladies give, before, during and after the sale! To help justify that new purchase, be sure to check out all of Retta's designs at Royal Inspirations SVG and see what she has waiting for you to create.

As always, thanks for stopping by!  I will be sharing more creations made from some of Retta's files with you as I have other things from her shop that I thought were just too cute!  Plus, I have some of my own files to share with you soon too as soon as I can find more time!  That's the great thing about working with someone else's files, it takes a whole lot less time to actually "create" the end project!  See you soon (I hope!!)

Thursday, May 10, 2012

MTC & now SVG files for Swinging Z-Fold Card


******* UPDATED with SVG FILES - See Below - 2 files for each card size needed! ********

Good morning.  I have been doing a little crafting and creating some cut files for use with MTC recently.  However, I haven't had time to do the "behind the scenes" work that needed to be done so that I could share some of those files and information here with everyone.  DD's travel VB and DS's baseball is done for now (though we are now into Spring Football practices!) so that will free up some time (for a little while). DD has had her meniscus surgery done and that went well. She is on the mend and hopefully it will be a short recovery rather than a long one.  However, it also means that I am back to driving and picking them up everyday for school while she is still on crutches!

Anyway, some of my limited crafting time was used to create 2 different MTC files for the Swinging Z-fold card.  I found the information and tutorial for this card on the Splitcoast Stamper's website here: http://www.splitcoaststampers.com/resources/tutorials/swingzfoldcard. There is also a link from there to the Gallery where people have posted cards that they have made using the tutorial.

It was created by Beate John's and shared there. I have simply created MTC cutting files for it to make it quicker and easier to make one of these cards!  Thank you to Beate's for the tutorial that I found.  You can find it also on Beate's Blog: http://beate.blogs.splitcoaststampers.com/2010/12/16/tutorial-on-scs-swinging-z-fold-card/.  She also has a link there to her YouTube video she compiled on how to make the card for those of you who are more visual learners!

You can also do a Google search for "Swinging Z-Fold Card" and find pictures of other cards people have made for examples. I found quite a few really cute ones (one of which is why I decided to create this file so I could make some!)

These are the two cards I made quickly to test my cutting files.  Neither of my files include the bear or the cupcake images that I used as they are stamps that I have.  I haven't "finished" the larger card with the bear and his ice cream cone.  Saving it to decide if it is a birthday card, a get well card, or some other type card.  Once I have a specific use for it, I will finish it off with the needed sentiments!

You can download my MTC Cutting files for the swinging Z-Fold card below.  I have two sizes of files, Beate's original pattern creates a 4 1/4" x 4 1/4" card when folded.  I first created a file based on her directions.  However, I prefer larger card sizes so I then created a second file that will create a 5" x 7" card when folded. I am making both of them available to download here from my Dropbox Account. In the Notes section of my file you will also find a PDF file showing the different "parts and pieces" to this card as well as pictures of these quick sample cards I made just to make sure that the cutting file was working properly.

NOTE: When trying to download these files, if you are unable to left click and save the files to your computer you may need to do a right click and a "save as" in order to download and save. They are saved and downloaded from my DropBox Account.

Download the MTC file for the original 4 1/2" x 4 1/2" Small Swinging Z-Fold Card here. This file has a scalloped circle.

Download the MTC file for the larger 5" x 7 1/2" Large Swinging Z-Fold Card here. This file has a plain circle.

****************** EDITED TO ADD THE SVG FILES *************************
NOTE:  Each size (Large/Small has 2 Files that need to be downloaded for the SVG Files! 
(sorry for the delay in sharing the SVG files!)
***************************************************************************

Download the Large Swinging Z-Fold File 1 of 2 here.
Download the Large Swinging Z-Fold File 2 of 2 here.

Download the Small Swinging Z-Fold File 1 of 2 here.
Download the Small Swinging Z-Fold File 2 of 2 here.


It would be fairly simple to take either of these cards and replace the scalloped or plain circle with another shape if desired (using the Node Editing Tools in MTC.) Feel free to experiment and come back and show us what you have made!

As always, thanks for stopping by.  I would love to see what you create with either of these files!

Thursday, April 12, 2012

Sliding Pop-Up Card MTC File to Share

This is picture of card closed as first seen.
Hey everybody.  I wanted to share this Make the Cut file I created based on a Sliding Pop-up Card Tutorial written and shared by Kim Score on the Splitcoaststampers website.   There is also a video tutorial shared there as well for those who want a "visual".  You can also check out the Splitcoast Gallery of cards created based on this tutorial as well. Kim used a Raggedy Andy style image to popup on her's, he is so cute, I think that is what first drew my attention (looks like might have been a valentine card). (I Love the Mickey one in the Gallery that was created by midnightsmum as well!) You can also find Kim's personal blog at Paper Punch Addiction. I need to go check out her site and see more of her work!

They are fairly simple "pieces" to cut and score manually so some might wonder why I would create a "cut file" for something like this.  Well first, I am manual paper cutter and ruler challenged!  LOL  I cannot seem to get a "straight line" for the life of me.  Plus, I hate having to have to "measure" all the time.  By creating this cut file, I don't have to worry about cutting the edge straight or measuring off for the score lines each time I want to create this card.  I just lay my paper on the mat, press a few buttons, and I'm ready to start assembling!  There are several "notes" in the cutting file so be sure to read those, especially regarding how to use score lines in the file if you are unfamiliar with that.

This is picture of card opened and showing message.
My sample card was created using double sided paper and a "print and cut" cupcake image I had previousl found for free online and cut with the Silhouette SD (it was in my cut but not used yet pile!).  Kim does recommend using a heavy cardstock when making htis card.  I didn't have a really heavy cardstock so used what I had.  It worked okay but I can see where a heavier cardstock would probably be better.

 Make sure that you read Kim's directions throughly before starting to assemble. I would also recommend creating a "mock-up" first from some inexpensive paper before using any good paper that you only have 1 sheet of! Watching the video would probably be a good idea too! It's not really that complicated once you get it all figured out. Good luck and let us see what you create with the file!  Please note, the file does not include the cupcake with the candle.

As always, thanks for stopping by!  DD's Travel VB will be ending soon and I hope to be able to maybe start to create and share some more files here on my blog sooner rather than later!

If you have a 4shared account you can download the MTC cutting file here Sliding Pop-Up Card. If you don't have a 4shared account, you can signup to get one for free and then download the file.  This appears to be a change in their Terms of Use, you didn't need to have your own account in the past in order to download my files. I am exploring other options for sharing my files since I don't want people to have to have a 4shared account just to get my files. However, since I don't charge for my files and I don't have ads or anything on my blog to make $$ I need to find a simple and free option to do so.  Stay tuned and I will update as soon as I figure something out! I have only shared a MTC file here since that is how I created my file and it is really fairly simple file to recreate from Kim's directions if you prefer another format.

UPDATE:  I have also shared the file in a dropbox account.  You can find the Sliding Pop-Up Card there as well. It should download directly to your computer.

Wednesday, January 11, 2012

Flowers Anyone? - Flowerpot Pocket or Slider Card


I created these two files and shared them almost a year ago on my old blog. These are my own personal files I created from scratch using the Make the Cut (MTC) software. However, the general IDEA is not mine. I have seen diferent versions of these types of cards in a variety of places before. BUT, what I had not seen was one where the card its self could actually stand up so that it could be displayed to look like what it is, a pot of flowers. So, first I created the base card and then I modified the bottom of the base so that it could be "folded" so that it would "stand" up. I like it. I hope you do too. You can use it for a variety of sentiments, Get Well, Sympathy, Happy Birthday, etc. - anything where you might want to send someone some flowers!!

Both files will fit in a 5x7 envelope if you place your flowers properly!! Use as many flowers as you want. I have 3 on one card and 4 on the other. I added dimension to the circles with the swiss dots cuttlebug folder and inked the raised dots by swiping the ink pad across them gently.

You can put a piece of ribbon and a tag around your "pot" if you want, ink it, or decorate the pot its self- use your imagination.
To create the regular "flat" fowerpot card - fold the base or "pot" in the center of the pot so that it is equal on both sides. Then fold the tops down and score at 1" on each side to create the lip or the rim of the pot. You can adhere the lip or rim of the pot to the pot or not to hold it down more flat (use glue dot, double stick tape, etc).

To create the Standing Flower pot card so that the receiver can stand it up like an actual pot of flowers, create a mountain fold in the center of the base pot so that it is equal on both sides, THEN score at the 1/2 inch on EACH side of the center fold and make these scores valley folds.

PLEASE NOTE: the smaller STANDING file has had more "depth" added to the pot to allow for these extra folds to allow it to stand up. You will not get the correct dimensions if you try this with the larger file.
I hope all of this makes sense. This is one of the reasons I hadn't yet posted the file. I wanted to do detailed directions. I'm not sure these are great, but hopefully everyone will understand them!! LOL If not, leave me a note and I will try to do a better job.

I am only sharing this in the Make the Cut (.mtc) file format as that is how I created my files to begin with. The files have a couple of pages to them. One page has a variety of different "flowers" I created using basic shapes. Then I layered them to create my flowers. Since It's been a couple of weeks since I created the files, I don't recall what all is in them to tell you the truth! LOL

I have had a couple of requests from people who do not have MTC but could use the file if it was in .svg format. I'm sorry, but right now I have not created this as an .svg file. There are a variety of reasons for this. Primarily because it takes times to convert the file and test the cuts and make sure everything works like it should before sharing the file. I NEVER share a file unless I have test cut it myself to make sure that it works as it is intended. As a result, I haven't had time to convert the file to an .svg file. I may try to do that soon however so check back!

I would love to see any that you make and hear what you did with them. Thanks for stopping by.

If you have a 4shared account you can Download the Larger Flat Flowerpot Card here and/or Download the Smaller but Standing Flowerpot Card here.

If you don't have a 4shared account, I have now added these files to my Dropbox account and you can download the files from there as well.  You can Download the Larger Flat Flowerpot Card here and/or Download the Smaller but Standing Flowerpot Card here.

As always, thanks for stopping by and I would love to see what you create with either of these files!