Welcome!

Welcome to my New Blog. This blog is for sharing my crafting ideas and my cutting files that I create primarily using the Make the Cut Software and my electronic cutters which include my 18" Black Cat Cougar, a Silhouette SD, and an original Expression.

All files and information shared here is for your personal use only. Please contact me if you wish to use any items commercially, for blog contests, or to submit for magazine publication. Thank you.

Monday, November 26, 2012

Intricate 3-D Christmas Tree

Another old post from my old blog. I wanted to share the tree again because I wanted to show you first how beautiful it was.  Second, I wanted to show you that you can find designs and patterns to use with your electronic cutters from many places. Just keep your eyes open!

I just had to share a picture of this beautiful christmas tree!  I originally got the pattern from the 2010 Holiday, Issue 41 of Scrollsaw Woodworking & Crafts magazine. It has several more patterns of things I plan to use with my Make The Cut Software (Hmm, I think I need to go and find that magazine and see what those were!  I don't think I ever got around to doing more from that magazine!)  I have previously noted that Scrollsaw patterns are a great source for things to cut with an electronic die cut machine.  This pattern was created by Gloria Cosgrove. (She was also the creator of the "Treasures of the Sea" seashell patterns that I previously made into cutting files and shared on my blog. You can find that post here: Treasures of the Sea.)

You can find more of her work at http://www.papercuttingsbyalison.com/.)

Unfortunately, I can't share the pattern with you do to the magazine's copyright permissions.  : (  

I must also say that I cut this using "tagboard" that I found at Hobby Lobby.  It is a little thicker then cardstock.  I tried cutting with regular cardstock.  It is a little too flimsy.   If anyone knows where I can get a little thicker paper like tagboard in colors please let me know.  Or if you have suggestions of something even a little thicker then the tagboard, I would like to try it. The tagboard works, but I would like something a little more sturdy I think.

I tried cutting it on my Cricut Expression - didn't cut so well - either tore up the paper or left all the little pieces still inside and I was having to try and finish punching them out.  I have a Black Cat Cougar 18" die cutter.  It cut it out beautifully and I didn't have to finish punching out lots of little pieces!! I bought my Black Cat Cougar a couple of years ago from Sherri at thatscrapinc.com. I had a great experience and excellent customer service both before and after the sale. So, if you are interested in finding a good quality cutter, be sure to check with Sherri and check out their new line, The Silver Bullet Professional series. I haven't upgraded to it but I hear it's even better!

If you aren't familiar with Make the Cut software, I would highly recommend that you go to their website to learn more about it.   You can find it at http://www.make-the-cut.com/.  It allows you to do so much more with your die cutter. You will be amazed. You are limited only by your imagination!! You can check out their forums for more great ideas.  You can also use SCAL (Sure Cuts a Lot), the Silhouette Software, and other software packages to cut to a variety of different and excellent die cutting machines in a variety of price ranges so be sure to check out all your options and find a cutter and the software package that works best for you and your needs! I am always happy to answer questions on what I have and why.

As always, thanks for stopping by!  Hope everyone has a blessed holiday season!


Friday, November 23, 2012

Rudolph Treat Box

This is another older post from my old blog from one of the 2010 Christmas Challenges on the MTC forum.  A MTC file was shared in the Challenge thread at that time for a piece of cake or pie box.  The challenge was then to make it into an ornament or something else.

I made them to be filled with treats that could also be hung on the Christmas tree.  My favorite one I made was Rudolph the Red Nose Reindeer.  This is not my original idea.  I have seen it done several times before.  I just think he is cute!!

I used google eyes and a red pom pom nose. The antlers are pipe cleaners and can be used to hang it on the tree.  Filled with small treats, it would make any child or adult very happy!! I don't have a cut file to share because I used one shared on the MTC forum but I am sure you would have no problems finding a similar file to use for your cutter and software.  I just wanted to "share" my photos to inspire you!

As always, thanks for stopping by. I hope everyone has a blessed holiday season no matter what holidays you may celebrate.

Wednesday, November 21, 2012

Gift Card Holders (With MTC files shared)

This is another old post from my old blog that was seasonal that I wanted to share here.

One of the challenges on the MTC forum Christmas Challenges (back in 2010) was to create some gift card holders.  Well, I had quite a few different gift card holders already on my old blog at that time.  However, when I started looking, it didn't look like I had any or very few using MTC so I decided to take on that Challenge.

The Challenge was to make 3 different gift card holders.  I did the traditonal standby Christmas Stocking, a "gift bag" that I turned into a "santa bag" and a simple tri-fold gift card holder.  The "bag" or "Santa belly bag" can be used as a simple shopping bag.  It is also big enough to hold the bigger Itunes gift cards - especially if you use something like the fur that I used at the top of the bag. I shared the files I created on the MTC forums before Christmas 2010 so, if you are a member there, you may have already downloaded my files.  If you aren't a member or were not back then you may not have gotten these files so I am putting them here for your use.

They are .mtc files only as I haven't converted them into any other format.  So little time and so much to do!!  LOL  Hopefully, someone can find a use for some of them.  As always, I would love to see what you do with them should you choose to use them for a gift!  Thanks for stopping by!!

If you have a 4shared account than you can access the original files I shared here:

You can download the Stocking Gift card holder here.

You can download the Santa Belly Bag gift card holder here.

You can download the tri-fold gift card holder here.

If you don't have a 4shared account, I have now uploaded them to my dropbox account and you can download them from there right here:

You can download the Stocking Gift card holder from dropbox here.

You can download the Santa Belly Bag gift card holder from dropbox here.

You can download the tri-fold-gift card holder from dropbox here.

As always, thanks for stopping by.  I would love to see anything that you create with my files.


Tuesday, October 16, 2012

Have a "Sweet" Birthday "Print and Cut" Image

A couple of weeks ago, someone on the MTC forum had asked how to take a "digital" image of a cupcake with some text and stars encircling it and "change" the color of the text in a word processing program or some other program. The problem was the file was a png file and it was not "editable" in that format. I had suggested that the user could use "pixel trace" in MTC to pull the image in, break it apart and make it "editable" so she could change colors, etc.  I then proceed to do that in MTC to show her.  Well, it took a little time and effort to do it (more than I originally thought it would).  So, then I decided to see if I could create my own similar file directly in MTC and see if it would take less time then trying to pixel trace and edit the other one.  To do the circles of stars and the text in a circle, you use the "wrap object to path" tool in Make the Cut.  (I wrapped to a circle sized as needed.  Once that is done, you can delete the circle as it is not needed). Time wise, this one may have taken a little less time on the whole but probably not a lot.

However, since this one is a file I created on my own, I figured I would share it here for anyone who might like to make use of it. My vision was that it would be used as a "print and cut" or like a digital stamp image that you printed out as opposed to a "paper piecing." Each part of the image is on its own layer and can thus have its "color" changed easily.  Don't want yellow stars, make them purple. Want one row of stars one color and the second row another, you can do that as the two rows of stars are on separate layers.  Want the text to be orange, easy to do.  Prefer yellow icing on your cupcake, go ahead after all, its your card and your image - give it your own personal touch! The bottom image shows how easily I changed colors in the file.

I'm sharing both a MTC file as well as an SVG file for you to download.  These are shared via my public folder in my dropbox account. As always, I would love to see anything that you might create with this file.  It would make a great image to use in the middle of the "swinging Z" cards that I created and shared previously here on my blog.

You can download the Sweet Birthday Cucpake MTC file here.

You can download the Sweet Birthday Cucpake SVG file here.

As always, thanks for stopping by.


Sunday, October 14, 2012

Happy Halloween - Witchy Footwear Card

Another Halloween post from my old blog first shared back in 2009.  (Wow, can't believe it has been three years!)

I had purchased the Sept/Oct 2009 copy of PaperCrafting Magazine. It has several cute card ideas in it. One is a "Witchy Footwear Card" designed by Kim Hughes.

I liked the card but of course wanted to be able to cut out multiple of the cards with my die cutting machine. So, with the help of my scanner and computer, I downloaded the pattern for the Witches Boot, and created an .svg file with Inkscape (MTC was not yet out then. Today I would scan directly into MTC.) Since the "card" requires a "front and back" and the pattern only had 1boot, I had to copy it and then flip it and then weld it to get my "card".

If you have a 4shared account, you can download the single Witches Shoe .svg file here. You can download the Witches Shoe CARD .svg file here.

I have also reloaded the files to my Public Dropbox account for those of you without a 4shared account.  They can be downloaded here: single Witches Shoe .svg file or the Witches Shoe Card .svg file.

As always, thanks for stopping by.  Please let me see what you create with any of my files!

Saturday, October 13, 2012

Treat Bag - SVG File

Another old post from 2009 from my old blog.  I made this into a Halloween Treat bag but it can easily be made into a treat bag for any holiday, season, or reason.  Simply remove the "witch" and use another image of your choice.

I love magazines with patterns!  I had picked up the Sept/Oct 2009 edition of the Paper Crafts magazine.  It has several cute ideas in it for Halloween.  One idea was a "Haunted House Treat Box" designed by Daniela Dobson on page 44 of the magazine.   The pattern for the "Treat Bag" was available to download from their website, http://www.papercraftsmag.com/index.html. It is really just a simple little bag who's finished size is about 3 1/4" x 5 1/4" x 1 3/4".  The "Haunted House" part was just decorative paper added as a "wrap" to the bag.

Back in 2009, I downloaded the pattern, scanned it into my computer, and imported it into Inkscape and converted it into an .svg file. Now with MTC and several of the other programs there is no need to use Inkscape first.  I could have scanned it directly into MTC.

Here in my sample file I created, I added the witch brewing in her caldron .svg file that was posted yesterday to the middle of the bag to cut out the image.  I then added a piece of acetate or clear plastic to the inside of the bag over the "hole" left by the witch cut out. This allows you to "see" into the bag.  I then used my MS drippy goo punch to punch out a strip that I added to the top of my bag.  I then cut a larger "wrap" to add to the bottom and stamped "Boo to You" and wrapped it around the bag.  I then added some stickles to the drippy goo and the "boo to you".

If you have a 4shared account, you can download the .svg "treat bag" file here.   If you don't have 4shared, I have added the file to my Dropbox account and you can download it from here: Dropbox Treat Bag .svg file.

If you don't want the witch to cut out, simply delete it from the file or replace it with a different object, a cupcake with a candle, ballons, a snowman, etc.  Anything that would fit your "theme".

Have fun and let me see what you create with the file.  The score lines are not marked.  Again, I think that they are "obvious" but if not, you can find the original pattern with the score marks online at Paper Crafts magazine's website listed above (Please note: as this is an old post, I have not verified that this article and file can still be found at the Paper Crafts website.)  However, it is missing one scoreline on the bottom flap.  In addition, the way this pattern is laid out and cuts, you will need to hand cut a little more the two side "flaps" up to the score line to fold properly.  Please let me know if you have any questions or problems!  Thanks for "popping in".

Friday, October 12, 2012

Halloween is "Brewing" - SVG file

Another old Halloween image from my old blog again shared back in 2009.

Here is an image of a witch brewing her potions in her caldrun.

If you have a 4shared account, you can download the .svg file of the witch and caldron here.  If no 4shared account, you can download the .svg file of the witch and caldron from my public dropbox account.

Again, use it on a card, use it to create a vinyl wall hanging or other home decor project.  As always, thanks for stopping by.  I would love to see what you create with any of my files.

Thursday, October 11, 2012

Halloween - Frankenstein Head .svg file to share

Continuing to share old Halloween posts from my old blog.  Again, this one is from 2009. It is an .svg file of a Frankenstein head. This one has a new twist with it that wasn't there in the 2009 post.

Here on this sample I have added in the "whites" of the eyes with a white pen and drawn in the stitch line on his forehead and his mouth. If you have a 4shared account you can Download the Frankenstein .svg file here. If you don't have a 4shared account (and don't want to create one) I have reloaded the file into my public dropbox account for you to grab it from: download the Dropbox Frankenstein .svg file here.

The new "addition" to this post is this  "halloween treat guy" made using this head at this post on the Make the Cut Forum here. That post contains a .mtc file for this head and a couple others:

http://forum.make-the-cut.com/discussion/27540/halloween-pumpkin-guys-treats#latest

That thread on the MTC forum has a MTC file that contains not only this Frankenstein head, but also a Jack-o-lantern Head and a Witch's Head to create these "treats" with.  It also contains a link to the blog where the original idea was found which was "Stuff Your Mom Didn't Make".

You will notice in that thread that I have set the files up so that they can be cut out and paper pieced as shown in the picture above from my original post in 2009 or that can be used as a "print and cut" with MTC.  Print and Cut was not an available option for us back in 2009! I really like doing "print and cuts", especially for something like this.  As always, thanks for stopping by.  Would love to see what you create!

Wednesday, October 10, 2012

Broken Picket Fence

Yet another old post from my old blog for use with Halloween:
This one is a broken picket fence file that I originally shared back in 2009.

Again, if you have a 4shared account you can still download the Broken Picket Fence .svg file here.  If you don't have a 4shared account, you can download the file from my Dropbox account here: Broken Picket Fence.svg file at Dropbox.

I hope you will share anything you create with one of my files.  As always, thanks for stopping by!

Tuesday, October 9, 2012

Flying Witch Silhouette .svg file

Another old post from my old blog that dealt with Halloween related items.  Figured I'd get them reposted to this blog during the month of October.

Yes, I am in "Halloween Mode"! Here is a Flying Witch .svg file.  You could cut her out of paper and put her on a card or cut her out of vinyl for a wall or window decoration.  Use HTV vinyl and put her on a t-shirt or sweatshirt.

I would love to see any projects that you create with this or any of my other files.  I like to see people are getting a use from them.

If you have a 4shared account, you can still download the Flying Witch .svg file from there. However, if you don't have 4shared, you can now download the Flying Witch .svg  from my public Dropbox account.

Monday, October 8, 2012

Jack-O-Lantern Basket


Another old post from my blog for Halloween.  However, the idea or concept could be used for any season or holiday.

This is a quick and easy project using your electronic cutters and a small basket.  I am not sharing any cut files as it would be easy to recreate my idea but the sizing will vary based upon the basket used.

Measure the "circle" of your basket and cut a circle out of orange vinyl to fit the lid of the basket.  cut around any hinges that may be on the top of the lid (mine had a leather strap that I used to be the "stem").  Apply the orange circle to the top of your lid.  Then cut out the jack-o-lantern's face from black vinyl.  You could use the dbjackopatterns from Lettering Delights to creat a .svg or .mtc file or any other place you can find "jack-o-lantern" faces to easily create your own basket.

Sunday, October 7, 2012

Flap Card

Please Note: This is an old post from my old blog.  I have several "Halloween" items that I had previously shared on that blog that I wanted to "repost" here on my newer blog. Technically though, this idea could be used for any time of the year you needed a "gift card holder." I just happened to have made them into "Halloween" ones.  They could also be used to put a small package of "flat" Halloween candy into.  (Think M&Ms, skittles, etc.)

 I was browsing around on Splitcoaststampers.com and ran across this cute "Flap Card" created by Rose Ann Reynolds.  This is a simple tri-fold card that makes a small card or can serve as a cute gift card holder. You can find the Tutorial with the directions and pattern on the splitcoaststampers site here.

You can also go check out  Rose Ann's blog, "Paper Delightz," with other cute ideas and projects created by her.

I made my "flap cards" into Halloween cards.  I have made them into gift card holders and plan to put $5 McDonald Gift Cards in them for my children and my nieces and nephews. To use as a gift card holder you can either use a kraft knife to cut "slits" into a couple of corners of the mat inside to hold the gift card (use the card to position where the slits need to be placed), or simply put some repositionable glue on the back of the gift card, or make a pocket out of the inside mat (you may need to cut that down a little to create the pocket and still be able to see the gift card).  The finished size of the card is 4.25" tall by 3.5" wide.  Just the right size for a gift card holder.

If you have a 4shared account you can Download the .Flap Card mtc file for Make The Cut here.  Download the Flap Card .svg file here.  (These were the original files shared via 4shared. At that time 4shared did not require you to have an account.) If you don't have a 4shared account I have now loaded these into my public folder in my dropbox account to share. Download the Flap Card .mtc for Make the Cut here. Download the Flap Card .svg file here.

 Note that my .mtc file has information and notes available under the Notes Bar.  Sadly, I cannot add "notes" to the .svg file.  So I will note here that I have added two "flaps" for the "flap" should you wish to add mats and decorative paper to the front flap of the card.  It then has 1 smaller mat overlaying decorative paper to the larger mats that are there to cut and use on the outside and inside of the card as used on Rose Ann's sample pics in her Tutorial.  Thanks for stopping by.  Would love to see what you do with my files!

Wednesday, July 25, 2012

Happy Birthday Book or Card from Royal Inspirations SVG

Hello again!  Two posts in two days!  A new record for me!  LOL  Well, at least for the past little while.  I'm going to try and get better, I promise.  I do have some things to share with you, just no time to sit down it seems to get it all written up, photos taken, and posted! Summer time seems to make it even more difficult.  We'll see if I can improve once school starts back next month!

Yesterday I shared with you a new site, Royal Inspirations SVG started by my friend Retta. On her site she has lots of wonderful files that you can obtain in 3 formats so she should have almost all of you covered.  Not only does she provide the files in SVG format, but she also provides them in Make the Cut (MTC) and SCAL formats as well so that should mean that she probably has a format that works easily for you!  She has files in a variety of categories and price ranges and even has free files for you to download and try so be sure to stop by and find some that will inspire you!

When I saw this Birthday "Book or Card" that Retta designed I just knew that I had to have it!  I wasn't sure when I was going to actually use it, or who the lucky recipient was going to be but I knew I had to get it and create it!  It's wonderful!  The one thing I learned however is that with something like this, you want to make sure that you have a really good sticky mat to ensure those beautiful letters stay put on the mat while you are cutting them!  I have a bad habit of trying to reuse mats over and over and over again even when I should stop and fix them!  I thought I could squeeze a few more cuts out on this one with a little help from my painter's tape but no go.  However, once I broke out a new mat, it was easy breazy and I was wondering why I had wasted my time and paper to start with!

Instead of using chipboard for my "book" backing, I choose to use some neon green styrene that KarenP had first shared about finding on the MTC forum.  It matched great with my green letters and added just enough backing to my pages.  It gives the book that little extra "pop"!  Best of all, it and Retta's files cut great on my Black Cat Cougar that I have been neglecting! 

Speaking of my Cougar, I Love my Cougar, but that doesn't mean that I'm not green with envy about those who are getting the newest cutter, The Silver Bullet,  from Sherri at That's Scrap, Inc. in the USA, Dawn at Thyme Graphics in the UK  and Jo at Cutting Edge Craft in Austrailia too! They look wonderful and I am hearing great things about how well they are cutting too!  Wish I could justify getting one too (I do love new gadgets and toys) but I will stick with my Cougar for now as it does everything I need and more.  I just need to use it more (then maybe I can justify a Silver Bullet too! : ) )  However, if YOU are in the market for a new cutter that will work with MTC and SCAL be sure to swing by and check out the Silver Bullet!  They may just have one with your name on it! But even better than the cutters themselves, is the customer service and support that each of these 3 ladies give, before, during and after the sale! To help justify that new purchase, be sure to check out all of Retta's designs at Royal Inspirations SVG and see what she has waiting for you to create.

As always, thanks for stopping by!  I will be sharing more creations made from some of Retta's files with you as I have other things from her shop that I thought were just too cute!  Plus, I have some of my own files to share with you soon too as soon as I can find more time!  That's the great thing about working with someone else's files, it takes a whole lot less time to actually "create" the end project!  See you soon (I hope!!)

Tuesday, July 24, 2012

Frog Card created with file from Royal Inspirations SVG site


Hello everyone.  Thanks for stopping by.  No files of my own to share today but I wanted to show you this card that I made with a file from my friend Retta's new site, Royal Inspirations SVG. I have obtained several of her new files recently and wanted to share a few of them with you here.  I have two things made already, this card and something else I will share with you tomorrow.  Retta's files are amazing and contain a lot of detail work but yet still cut so easily with my Make the Cut software and my Black Cat Cougar. So don't be fooled by the name of her site, she not only has SVG files, but she also provides her files ready to go for Make the Cut (MTC) and Sure Cuts A Lot (SCAL) users.  With those three options, she is sure to have a file type that will work for almost everyone!

This jumping frog is Retta's file.  I added a quick crown and lily pad of my own.  The corners of the mat were punched using a Martha Stewart punch.  I thought it looked like "bubbles" of water!  Notice all the detail to the frog!  Didn't Retta do a great job with all the detail to make him so adorable!  I thought he would make a cute card to send to my niece who recently broke up with her boyfriend.  I decided not to add any wording to the front of the card and simply added it to the inside.  Inside I put, "Look at it this way . . . another frog has been eliminated so you are that much closer to finding your handsome prince!"  I think she will appreciate it!  (She broke up with him so all is good there!) I pop dotted the frog and the crown up for dimension after adding some inking and glitter pen work.  I embossed and inked the lily pad as well.  It was a quick and simple card that I hope will make my niece laugh and it was so simple using Retta's handsome frog!  Be sure to stop by Retta's new shop and see all the other wonderful files she has to offer. You can find her site, Royal Inspirations, SVG here: http://www.mainstreetartsandcrafts.com/rettas/.

As always, thanks for stopping by!  I have another file of Retta's to share with you tomorrow.  It is even more adorable and great for a special birthday!  Then, I have some other things that I have been working on in the past few months but haven't found the time to sit down and share with you yet so be sure and stop back by soon and I will do my best to get those added too!

Friday, June 15, 2012

Dragonfly Stencil Edge Card (MTC & SVG files available)


Here's another "Stencil Edge" card that I made with my Make the Cut software.  They are really fairly simple to do once you understand the overall concept.  Fun and addicting too!  Again, I found the free dragonfly by doing a google search for images and made some tweaks to it before converting it and adding it to a card base.  Made this card in honor of my sister Melissa and my niece Jessica. They know why! I tend to prefer larger cards so mine are usually 5" x 7" but they can easily be resized as desired. If you missed my first 3 stencil cards go back to my post 2 back to see more of these or go to the MTC forums to find more.  Search for "Webinar Homework" on the forum.

The above is a screen capture of my image from MTC but I have test cut he file and checked the download links so everything should work fine. Thanks for stopping by!  Have a great weekend.


Download the Dragonfly Stencil MTC card here.

Download the Dragonfly Stencil SVG card here.


Thursday, June 14, 2012

Manly Card - Vest for Dad - .svg and .mtc files

******Another timely, but old post from my old blog.  A vest card for that last minute Father's Day card you might need to make! (I actually meant to repost this in time for Father's Day cards but forgot about it until now.  Don't forget Father's Day is this Sunday, just 4 days away!!!!**********

Hello. I was looking back through my huge stack of "ideas" and ran across a project that I had been working on a while back.  I decided to finish it up and put it out here to share with the blogging world.  I found the original pattern in a February 2008 edition of Paper Crafts magazine (page 60) entitled Vest Card. You can find the magazine's website at  http://www.papercraftsmag.com/index.html. (Unfortunately, the website no longer goes back to that edition!)  The article notes that the design was courtesy of Tinkering Ink & Mainly Stamps.  I believe Tinkering Ink's website address is: http://www.tinkeringink.com/ (but I didn't find anything there related to this Vest Card.)  I have seen other "vest" cards in the past, but this is where I got my pattern from.

First, I copied and cut out the pattern provided in the magazine.  I then enlarged it and scanned it to make my cutting file(s).

There really aren't any "directions" to provide. Once you cut out the card from a patterned cardstock, you simply fold the card at the middle of the arm holes so that the points of the bottom of the vest line up.  The "flat" side of the vest (as opposed to the pointed side) is the outside overlapping flap.  The .svg file does not have the "pocket" and the "hankie".  I hand created those and imported them directly into MTC from the scanner.  Glue the "hankie" to the backside of the "pocket" and then glue the pocket onto the front left side of the Vest.  You can then create "buttons" or add real buttons to the right front side of the Vest.  I created buttons with a small hole punch and glued them onto the card front. Then used a marker to make button holes.

Note these original downloads are from my 4shared account.  4shared now requires a free membership to download from their site.  So feel free to download from there if you have an account. If no 4shared account then see download option below.

4Shared Account Users - You can download the Vest Card .svg file here. You can download the Vest Card .mtc file here.  The MTC file is sized correctly and has the pocket and the hankie cuts as well. As always, let me know if you have any problems with any of my files and I would love to see what you create with any of them!  Thanks for stopping by. (Note these original downloads are from my 4shared account.  4shared now requires a free membership to download from their site.  So feel free to download from there if you have an account.)

No 4shared Account? If you do not have a 4shared account and don't wish to create one, I have reloaded these files to my public dropbox account and you can download them from there here. Note: You may need to do a right click and save, save as, save target as in order to save the files to your computer depending upon what browser you are using.  I have tested the files and the links and all appear to be working correctly.

Download the Vest Card .svg file here or download the Vest Card .mtc file here.

As always, thanks for stopping by.  I hope to have some other new files and pics posted for some neat projects in the next few days so be sure to stop back by!  Don't forget to show me what you create!

Wednesday, June 13, 2012

Stencil Edge Cards - both MTC and SVG files available

Hello. Just wanted to share some new cards that I made in the past few days.  They are "stencil edge" cards or in one case, just a stencil card.  Several of this style card had been shared on the MTC forum in the past few weeks and some people wanted to have it shown in a MTC Webinar how you would make them.  So Bryan showed several ways to do them in a MTC Webinar on 6/5/12.  I gather he did a followup on them again last night on the 6/12/12 Webinar (haven't seen that yet.  Will review when he gets it posted). During the 6/5/12 Webinar, Bryan had assigned homework for people to create their own versions of these cards and to then share pictures of them on the MTC forum. Pictures of many of the ones people have created have been shared in this thread on the MTC forum: http://forum.make-the-cut.com/discussion/25151/webinar-homework#latest.  (There are a few others scattered about in other threads(search the forum for stencil card) but this gets you to the bulk of them).

Julie from MTC_Tuts Yaho group also wrote a tutorial on using MTC to create a card like this.  You can find more information about the tutorial and where to find it by checking this thread on the MTC forum: http://forum.make-the-cut.com/discussion/25163/make-a-card-withastencil-edge-design-tutorial#latest

As a result, I decided to give a hand at trying them myself.  Some of the ideas I had considered making others had already done and I didn't want to recreate a similar card. So I looked for images that I had not yet seen done.   I choose an ice cream cone and a lighthouse.  While I was looking for free stencils that would work for this style of card, I ran across a sailboat that I really liked but didn't think was suited for putting on the edge of the card.  As a result, I chose to simply put it on the front of the card.  The pictures show the sample cards that I cut out to test my files.  The ice cream cone also contains a "print and cut" colored ice cream cone that I used behind my "stenciled" emage to add a pop of color to it.  This can also be "split" and the pieces used to create a paper piecing of an ice cream cone.  All cards have an insert to cut for the inside.  I think they would look great using vellum too.  Finally, the sailboat card also has a "stitching line" that I used to create  a stitched look with a marker on one of my cutters.  I think I will use the ice cream cone card either as a birthday or a simple "hello" card.  The lighthouse and sailboat may get used for father's day cards for my DH and my FIL.  Sadly my father is passed away so I cannot share one of my cards with him! If I don't use them for Father's day they could be used for several other things as well don't you think!

I created my original files in MTC but have exported them out into SVG for use by others with different software. I hope that you like them and would like to see what you do with the file(s).

The files are loaded into my public folder in my dropbox account.  You may find it necessary to do a right click and "save as" or "save target as" to save to your computer.

Download the Ice Cream Cone Stencil Edge Card MTC file here.

Download the Ice Cream Cone Stencil Edge Card SVG file here.

Download the Lighthouse Stencil Edge Card MTC file here.

Download the Lighthouse Stencil Edge Card SVG file here.

Download the Sailboat Stencil Card MTC file here.

Download the Sailboat Stencil Card SVG file here.

As always, Thanks for stopping by.  Please let me know if you use one of my files to create something.  I would love to see a picture or too!  I also have a few more things that I have been working on recently that I hope to find time to take photos of and to share soon here on my blog.  Some of them will have files to share as well so be sure to pop back in soon!

EDITED TO ADD:  You can see a birthday card made for SusanBluerobot with my Lighthouse card on Tracy's blog here: http://traceyfarr.blogspot.com/2012/06/another-stencil-card-for-susan.html?showComment=1343081980251#c6827046814225669317!  Thanks for coming and sharing your link with me Tracey so I could see your card you made for Susan!

Thursday, May 10, 2012

MTC & now SVG files for Swinging Z-Fold Card


******* UPDATED with SVG FILES - See Below - 2 files for each card size needed! ********

Good morning.  I have been doing a little crafting and creating some cut files for use with MTC recently.  However, I haven't had time to do the "behind the scenes" work that needed to be done so that I could share some of those files and information here with everyone.  DD's travel VB and DS's baseball is done for now (though we are now into Spring Football practices!) so that will free up some time (for a little while). DD has had her meniscus surgery done and that went well. She is on the mend and hopefully it will be a short recovery rather than a long one.  However, it also means that I am back to driving and picking them up everyday for school while she is still on crutches!

Anyway, some of my limited crafting time was used to create 2 different MTC files for the Swinging Z-fold card.  I found the information and tutorial for this card on the Splitcoast Stamper's website here: http://www.splitcoaststampers.com/resources/tutorials/swingzfoldcard. There is also a link from there to the Gallery where people have posted cards that they have made using the tutorial.

It was created by Beate John's and shared there. I have simply created MTC cutting files for it to make it quicker and easier to make one of these cards!  Thank you to Beate's for the tutorial that I found.  You can find it also on Beate's Blog: http://beate.blogs.splitcoaststampers.com/2010/12/16/tutorial-on-scs-swinging-z-fold-card/.  She also has a link there to her YouTube video she compiled on how to make the card for those of you who are more visual learners!

You can also do a Google search for "Swinging Z-Fold Card" and find pictures of other cards people have made for examples. I found quite a few really cute ones (one of which is why I decided to create this file so I could make some!)

These are the two cards I made quickly to test my cutting files.  Neither of my files include the bear or the cupcake images that I used as they are stamps that I have.  I haven't "finished" the larger card with the bear and his ice cream cone.  Saving it to decide if it is a birthday card, a get well card, or some other type card.  Once I have a specific use for it, I will finish it off with the needed sentiments!

You can download my MTC Cutting files for the swinging Z-Fold card below.  I have two sizes of files, Beate's original pattern creates a 4 1/4" x 4 1/4" card when folded.  I first created a file based on her directions.  However, I prefer larger card sizes so I then created a second file that will create a 5" x 7" card when folded. I am making both of them available to download here from my Dropbox Account. In the Notes section of my file you will also find a PDF file showing the different "parts and pieces" to this card as well as pictures of these quick sample cards I made just to make sure that the cutting file was working properly.

NOTE: When trying to download these files, if you are unable to left click and save the files to your computer you may need to do a right click and a "save as" in order to download and save. They are saved and downloaded from my DropBox Account.

Download the MTC file for the original 4 1/2" x 4 1/2" Small Swinging Z-Fold Card here. This file has a scalloped circle.

Download the MTC file for the larger 5" x 7 1/2" Large Swinging Z-Fold Card here. This file has a plain circle.

****************** EDITED TO ADD THE SVG FILES *************************
NOTE:  Each size (Large/Small has 2 Files that need to be downloaded for the SVG Files! 
(sorry for the delay in sharing the SVG files!)
***************************************************************************

Download the Large Swinging Z-Fold File 1 of 2 here.
Download the Large Swinging Z-Fold File 2 of 2 here.

Download the Small Swinging Z-Fold File 1 of 2 here.
Download the Small Swinging Z-Fold File 2 of 2 here.


It would be fairly simple to take either of these cards and replace the scalloped or plain circle with another shape if desired (using the Node Editing Tools in MTC.) Feel free to experiment and come back and show us what you have made!

As always, thanks for stopping by.  I would love to see what you create with either of these files!

Thursday, April 12, 2012

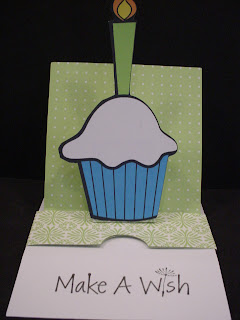
Sliding Pop-Up Card MTC File to Share

This is picture of card closed as first seen.
Hey everybody.  I wanted to share this Make the Cut file I created based on a Sliding Pop-up Card Tutorial written and shared by Kim Score on the Splitcoaststampers website.   There is also a video tutorial shared there as well for those who want a "visual".  You can also check out the Splitcoast Gallery of cards created based on this tutorial as well. Kim used a Raggedy Andy style image to popup on her's, he is so cute, I think that is what first drew my attention (looks like might have been a valentine card). (I Love the Mickey one in the Gallery that was created by midnightsmum as well!) You can also find Kim's personal blog at Paper Punch Addiction. I need to go check out her site and see more of her work!

They are fairly simple "pieces" to cut and score manually so some might wonder why I would create a "cut file" for something like this.  Well first, I am manual paper cutter and ruler challenged!  LOL  I cannot seem to get a "straight line" for the life of me.  Plus, I hate having to have to "measure" all the time.  By creating this cut file, I don't have to worry about cutting the edge straight or measuring off for the score lines each time I want to create this card.  I just lay my paper on the mat, press a few buttons, and I'm ready to start assembling!  There are several "notes" in the cutting file so be sure to read those, especially regarding how to use score lines in the file if you are unfamiliar with that.

This is picture of card opened and showing message.
My sample card was created using double sided paper and a "print and cut" cupcake image I had previousl found for free online and cut with the Silhouette SD (it was in my cut but not used yet pile!).  Kim does recommend using a heavy cardstock when making htis card.  I didn't have a really heavy cardstock so used what I had.  It worked okay but I can see where a heavier cardstock would probably be better.

 Make sure that you read Kim's directions throughly before starting to assemble. I would also recommend creating a "mock-up" first from some inexpensive paper before using any good paper that you only have 1 sheet of! Watching the video would probably be a good idea too! It's not really that complicated once you get it all figured out. Good luck and let us see what you create with the file!  Please note, the file does not include the cupcake with the candle.

As always, thanks for stopping by!  DD's Travel VB will be ending soon and I hope to be able to maybe start to create and share some more files here on my blog sooner rather than later!

If you have a 4shared account you can download the MTC cutting file here Sliding Pop-Up Card. If you don't have a 4shared account, you can signup to get one for free and then download the file.  This appears to be a change in their Terms of Use, you didn't need to have your own account in the past in order to download my files. I am exploring other options for sharing my files since I don't want people to have to have a 4shared account just to get my files. However, since I don't charge for my files and I don't have ads or anything on my blog to make $$ I need to find a simple and free option to do so.  Stay tuned and I will update as soon as I figure something out! I have only shared a MTC file here since that is how I created my file and it is really fairly simple file to recreate from Kim's directions if you prefer another format.

UPDATE:  I have also shared the file in a dropbox account.  You can find the Sliding Pop-Up Card there as well. It should download directly to your computer.

Thursday, March 22, 2012

When looking for the football outline for the T-shirt to share, I ran across this football shaped card that I had also made last Fall but had never shared the cut file for.  I originally made the card to give to my son to celebrate scoring his first Varsity Touchdown!  He is just a freshman so that was a really big deal!  PLUS, it was even bigger because neither myself nor my husband was there to see it!  : (  In our defense, our school has to travel alot for our games and both DD and DS had games that night (she plays Volleyball).  He was 2-3 hours away and she was at home.  As a Freshman, he indicated that he probably would not get into that game so no need for one of us to come!  Alas, not true!!  We were winning by a good margin already and they put him in towards the end of the game and he scored!  I was so happy and yet so sad!  I did get to see it on the "Web" as we broadcast our games that way!  Anyway, I knew I needed to make him a card to celebrate and let him know we were sorry we missed it and we proud of his hard work and effort that gave him the opportunity to play.

There are several layers to the card.  There is a black base and then there are two white layers in the file.  I think I just went with the one with the 3 pieces cut rather than the solid white base.  I used the swiss dots embossing folder to add the texture and then used some ink to "rough" it up and make it look like a well used football.

You can download the  .mtc (Make the Cut) Football Shaped Card here.

Wednesday, March 21, 2012

Football Shirt Design

I had previously shared a picture of this football shirt that I made but realized that I had never shared the file when someone recently asked on the MTC forum for a "football outline" for making shirts and I was going to point them to my blog to get this one and when I came to get the link realized that I had not yet shared the file!  So, even though its not presently football season, I wanted to get this file up so I could share it with that person looking for one! There are two layers, a white layer and then a dark green layer that goes on top.


Please note.  It has my children's school logo in the middle (we are Spartans) - just delete and replace with logo of your choice. It is also "mirrored" already for cutting with HTV and placement onto a T-shirt.  If you don't need to cut and mirror just flip or unmirror it.

You can download the Football Outline for T-shirt here.

Tuesday, March 20, 2012

Crab, Palm Trees, Waves, and Umbrella for the Beach

Hey everybody.  Been extremely busy and hadn't gotten back recently to share any files that I have created but not shared (no time to create right now it seems either!). I happened to run across this file while "cleaning up" and remembered that I had never shared the file.  Looks like I made it a while ago!  It was from a free pattern I had found. It contains two palm trees with coconuts, the crab and the umbrella.  The sun is simply a small circle and the sand is torn kraft paper that I used the swiss dots embossing folder on and inked the edges and the "dots" to give it texture.  I used a "texture" ink pen on the wave tips.

You can download the Make the Cut file from my 4shared account here. (I use 4shared as it is free and easy to deal with).  Download the Crab, Palm Trees, Umbrella File here.

Saturday, March 10, 2012

Bunny Card With Files to Share

Continuing with another old post from my old blog. I liked the bunny card I posted yesterday so much that I REALLY wanted to share it with people.  SO, I decided to create my own bunny card using basic shapes in my Make The Cut Software.  Although this file was inspired by the previous Bunny Card that I shared yesterday from a pattern in the Spring, 2011 edition of Paper Creations magazine (Issue 28) designed by Maricel Fabi, this one I created from basic shapes in MTC.  Isn't it amazing what you can do by welding a few circles, ovals, triangles, etc. together!  If you look closely, you can see that difference in my bunny's ears, the paws, the nose, the vest, and his overall basic shape.

So, if you thought, "shoot, I would have really liked to have had that pattern" yesterday - now you can have one almost like it but one that I feel comfortable sharing here.  I have included in the Make The Cut file both a welded shape for the card joined and folded at the ears as well as a single bunny shape for use on other projects. There are two files for svg users.  One is for the card its self and the "accessory" parts.  There is a second one for the single bunny shape with paws and feet only. Thanks to Maricel for her inspiration.

I used the "swiss dots" embossing folder to emboss the inner ears on this one.  I didn't add "buttons" to the vest, I created a vest with the "buttons" cut out.(My file contains both vests, one with the circles cut out and one plain.) I pop dotted the nose and the paw holding the flower.  My sample card appears to have his left arm (paw)  "bent" behind him but there is an extra arm to add on that side if desired. This card used 15mm goggle eyes with lashes.  Yesterday's card the eyes were 10mm.  I had previously tried 10mm size with lashes when I made my first one but didn't like it for some reason.  I do think with the larger eyes it works.

Please let me know if you enjoyed my file and let me see what you do with it.  I also think he would be cute made into a "she" bunny (add some lace to the bottom of the vest and make a dress and add a bow to an ear) or holding an Easter Egg or an Easter Basket.  Just use your imagination!

You can Download my Make the Cut file of the Bunny Card here.

You can Download a SVG file of the Bunny Card here.

You can Download a SVG file of just the single Bunny Shape here.

Thanks for stopping by!

Friday, March 9, 2012

Bunny Card


Continuing on with old posts from my old blog.  I needed to show you this one before I share a file I created to be similar to this one tomorrow! This card is from  the Spring, 2011, Issue 28 of the Paper Creations magazine.  In the magazine, on page 22 there was an article entitled, "Bunny Card" which was designed by Maricel Fabi.  It was this really cute Bunny Card for which they provided a pattern pullout to trace and cut by hand. Now, anybody who knows me knows that I HATE to cut with scissors.  (I think this is because I am left handed and, when I was little, all scissors were made for right handed people.  It wasn't until "modern times" that they made left handed scissors or ones that didn't matter which hand you used!  LOL  You won't understand what a problem this is UNLESS you are left handed OR you are right handed and have tried to cut using left handed scissors!!  LOL)  This is what I got my electronic die cut machine and my Make The Cut software for!!!!


The pattern for the full card was too big to lay out on my regular size all-in-one printer with flatbed scanner so I simply scanned in 1/2 of the card.  I then copied the image, flipped it, moved it to overlap properly, and welded the two pieces together to make my card base.  I then scanned in or created the extra pieces and parts like the vest, the bowtie, and the nose.  Their pattern didn't include the flower and stem so I created those along with extra arms and legs in case I wanted to pop those areas and add extra dimension.


Then I cut out the card using my electronic die cut machine and made a cute Spring Bunny Card to send to someone in my family!!  Now, I can easily create as many of these bunny cards that I want quickly and easily (and it doesn't matter what kind of scissors I have!  LOL) Well, I couldn't stop there.  I thought hmmmmmm. . . . . . I'm not sure I like the card folding in 1/2 at his feet, so I then recreated the file so that he was welded together at the top at his ears.  I think I like that better as it opens the way most people expect a card to open.  But now, within just a few minutes of my time, I have two card bases from which I can choose!  THEN I thought, well, he might be cute on a regular card base so I made him a single image that I can now make any size I want and add to other cards.

This is the "Print and Cut" Bunny
Then I thought - well hmmmmmmm. . . . . . . I think he would be really cute if I made him into a "Print and Cut" file - I bet that I could do that really easy.  So I created a pink polka dot texture that I added to the "inner ear" parts I had created and a multi-colored striped texture that I added to his vest.  I found paper I had in my stash to get these "textures" from and scanned them into my computer and made texture files from them.  I then created a "full bow tie" with basic shapes and added a purple color to it.  I then made his body gray and added his mouth and his eyes to my MTC file so that they would "print".  I then printed the bunny out on my printer (I also added separate feet and hands to "pop" dot to give it some added dimension) and then cut him and the extra pieces with my Cougar (I could also have cut him with my Expression but the Cougar was the one plugged in!).  I then used Marker to ink the edges to give it some more dimension and chalked his cheeks.  Otherwise, its all printed!  IF I had a bigger printer (One that would print 12x12 say) I could have printed him out as a card.  Since I just have a regular 8 1/2 x 11 printer I printed just the single bunny.  HOWEVER, he could be glued on to the top of a card base.  He can also be resized easily.


Since the file I created was from a pattern in a magazine, I can't share it with you here even though I would like to.  HOWEVER,  I wanted to share all of this information with you to show you what YOU can do with a pattern, your die cut machine, your printer  and scanner and Make The Cut software and a little imagination!  Just IMAGINE!!! LOL

As always, thanks for stopping by.  Please let me know if you have any questions on how I did any of this or if I can help you out with anything. You can checkout the magazine's website here: http://www.papercreationsmag.com/. There you can see some of what is in their current issue, back issues and free projects and ideas.  I am not affiliated with the magazine at all but like to give full contact information when I use something from a source.  Thanks.

Thursday, March 8, 2012

Basic Bunny Shape - Make the Cut or SVG File to Share

Yet another old file from my old blog. I found this basic bunny shape when I googled for free bunny clipart and decided to make it into a simple cut file.  I am providing it both in the Make The Cut (.mtc) as well as an SVG file format. I hope someone can find some use for it.  Would love to see whatever you might do with it.  Thanks for stopping by!

Download the Make The Cut Bunny File here.

Download the SVG Bunny File here.

Wednesday, March 7, 2012

Bunny With Egg - Make the Cut and SVG Files Available

Another old file from my other blog.  I did several bunnies last year.  When I went searching for free bunny clip art I obviously found a couple of cute ones that I thought would make quick and easy cut files to share.

I thought this bunny was too cute!  I have cut the base out of a light blue and then cut the body pieces out of white, the eyes and mouth and nose line out of black and his nose out of pink.  I then cut the egg decorations out of a darker royal blue.  Once I had him put together, I chalked him a little with a light blue chalk on the edges and a little pink on his cheeks.  Depending on the size you wanted to cut, you might have some pretty small pieces.  If they are too small, just skip trying to get those glued down. The file is about 3 1/2" W x 4" H.

I hope some of you can find some cute uses for him.  Please let me see what you do with him.  He could also easily be made into a shaped card if you desired.  Just size all the pieces together to the size that you want the card then copy and flip the base shadow and weld those two base pieces together to form a card.

As always - thanks for stopping by.

Download the Make The Cut Bunny with Egg file here.

Download the SVG Bunny with Egg file here.

Tuesday, March 6, 2012

Another Bunny - Make the Cut and SVG Files Available

To continue on the bunny theme (I had a whole week of them posted on my old blog!)

This is another free coloring page that I found online.

You can download the Make the Cut Bunny File here.

You can download the SVG Bunny File here.

He would also make a cute print and cut.

Nelda from the MTC Forums took this file and made it into a cute bookmark holder with ribbon "ears".  You can see her project here:

http://papercraftingwithnelda.blogspot.com/2012/02/paper-clip-book-mark-bunnies.html

As always, thanks for stopping by.  If you make something with this file I would love to see it.

Monday, March 5, 2012

Pile of Easter Eggs (Make the Cut and SVG files available)


This too is another post from my old blog. Thought that all of the bunnies that I did needed some Easter Eggs to go with them! I found this pile on a free coloring book page on on-line and converted them into cut files for our use. The Make the Cut (MTC) file contains the pile of eggs as shown here.  Then it has a page with the pile of separate eggs on it (not the little pieces just the base eggs) and then a third page with a single egg on it.  The SVG file just has the pile of eggs.  You will need to break the svg file into its separate pieces once imported into the software of your choice.

Might also work great as a print and cut file.  You could quickly make a large pile of different color Easter eggs to use on a layout or a card.

I just did some quick chalking of the edges once I had it all glued down to give it some added depth and demension. (I always forget to chalk, ink, texture, etc. when putting my prototypes together!!)  More texture and dimension could be added by using embossing tools of your choice. Please feel free to leave a comment below.  Would love to see what you do with the file.  As always, thanks for stopping by.


Download the Pile of Easter Eggs Make the Cut file here.

Download the Pile of Easter Eggs SVG file here.

Saturday, March 3, 2012

Baby Chick Cracking through Egg - MTC and SVG Files Available

Another old post from my old blog.  (Trying to get all the ones with SVG files shared here on the new blog as they are the ones that I think people will continue to desire!)

Here is a baby chick or duck cracking through his egg.  I originally created the cutting file from a free coloring book page I found on-line. I am sharing both the Make the Cut (MTC) and SVG Files here for you.  I originally created the file in Make the Cut (MTC) and then exported it out as a SVG file.  I did not break the SVG file into its separate pieces and parts.  As a result, you will need to "break" the image into its parts and pieces when importing it to separate it out for its different colors. There are 6 layers to it. I would love to see what you do with the file.  Thanks for stopping by. I would love to see what you do with this, or any of my files.

Download the Baby Chick cracking through his egg Make the Cut file here.

Download the Baby Chick cracking through his egg SVG file here.